 PowerPoint has some amazing drawing tools that lets you create all kinds of illustrations. But sometimes it can be frustrating when you group text with an object to create an image because when you go to make it bigger or smaller the text remains the same size. That’s because you’re just resizing the text block, not the text itself. Bummer, right? Well, guess what—it’s possible to transform text into scalable graphics using the “paste as picture” command.
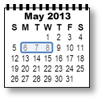
Before you think I’m just writing about some random PowerPoint command that you’ll never use, let me give you some examples of how useful this command can be. Many years ago I worked at a company that created a lot of manuals for clients, and our desktop publishing software of choice was PowerPoint. Yes. To personalize them, we’d draw pictures of reports with the clients’ names on them then paste them as pictures and use them as spot illustrations. Another way we’d use this command was to create little calendars with the session dates highlighted. Here’s what they look like (I can practically draw these in my sleep now.):

We’d create these graphics larger than what we needed, then we’d cut and “paste as picture” so that we could make them tiny and put them where we wanted in our documents.
You can also use the “paste as picture” command to resize charts and graphs if it turns out that you’ve made them too big or if you want to use them as illustrations.
All you need to do to access the “paste as picture” command is to right click anywhere on a slide after you’ve either cut or copied something. The window looks like this:
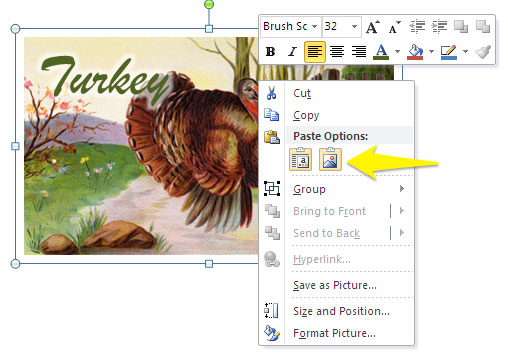
The yellow arrow is pointing at the little clipboard icon on the right after Paste Options; that’s the “paste as picture” command.
It’s important to note that when you paste something as a picture the text becomes uneditable, so be sure to save your source graphics just in case you need to make changes. As if that ever happens.
Here’s a video that shows this command in action and gives you some ideas on where you can use it.
Your turn
Was this news to you or have you been doing this already? If you already knew about the “paste as picture” command, how have you used it in your presentations?
Great tutorial and examples! I love the example of using the SmartArt as a small image at the top of the slide. I did want to mention that for SmartArt, if the text is part of the SmartArt (not a separate textbox on top of the SmartArt), the text will resize when you resize the entire SmartArt border. At least, that’s my experience. Also, you can ungroup SmartArt– twice — to change it to shapes to get lots of flexibility.
When creating common diagrams, I like to start with SmartArt because things are positioned correctly and it’s easy to enter text. After that, I usually convert the SmartArt to shapes to give me greater flexibility in recoloring and repositioning the elements, just as you describe.
If you select text in a SmartArt diagram and resize it, then it loses the capability to automatically resize itself. I’ve updated the tutorial. Great catch; I hadn’t made that clear at first.
Good post and demo. It’s worth pointing out that this issue affects more than text – line widths, shadow measurements and 3d parameters don’t scale on resizing either. In fact, anything measured by points won’t scale properly.
There is another workaround that almost works – see my blog post at http://wp.me/pFbc7-gk.
Thanks, Konrad, those are very good points.
This feature is very handy if you’re using a specialized type face in your presentation. Recently, I wanted the headline in some slides to be set in an unusual but thematically appropriate type, a type I knew other computers were unlikely to have. By creating the headline and then cutting and pasting as picture, I knew there would not be translation issues. Not practical for bullet points or large amounts of text (if you do that sort of thing), but for special accents it’s super.
I’ve done this too but I’ve always wondered if this is, strictly speaking, a violation of the font license…?
You can try to “embed” these unusual fonts in PowerPoint files so that issues don’t occur but this may not work if the font license has restrictions on embedding. Also, at one time there was a bug in this area that may have caused users to avoid embedding.
If you really want to use a font, conversion to a picture is surely the safest approach even tho it may not be kosher.
Here’s a good write-up on this issue: http://office-watch.com/t/n.aspx?a=1611.
It’s my understanding that if you distribute native font files to anybody except a printing company for the purposes of producing your artwork then you are breaking the law. Since with the Paste as Picture command you’re creating an uneditable version of words you’re still acting within the terms of the font license.
I think.
Sounds good to me.
Great tip! Paste as picture is huge, especially when creating data-heavy presentations where the charts are coming out of Excel. If you simply copy and paste the chart all the data comes along and gets embedded (or at least it used to…I haven’t tried it in versions later than 2007) and your PowerPoint file size explodes. Using “Paste as picture” and chosing the “Enhanced Metafile” file type converts the chart to a vector graphic that’s scalable and pretty small. You’ll have to go back to Excel if the data changes, but in my experience it’s likely you’ll be crunching the numbers in Excel anyway so that’s not a huge burden.
Great tips, Laura. Excuse me, but I would like to know which tool you used to make the video tutorial with your image in the corner eswquerdo. Is it free? I am Brazilian and I leave you my thanks.
Hello, Fatima, and thanks! I used Camtasia to create that video, which allows one to simultaneously capture screen actions and webcam video. It’s not free, but Screencaset-o-Matic is! It has less functionality than Camtasia, but you can still do a lot with it.
Thank you! I knew Camtasia. I will try o Screencaset-oMatic. Hugs Brazilians.