 During a recent one-on-one PowerPoint training session, my client asked me how to make two lines of text fit onto one line. I quickly clicked on an icon and made some changes, causing the text to pop into place.
“Whoa, whoa, whoa, what did you just do there?” the client asked. So I undid the change I had made and went through the process slowly so that he could follow along.
“You should make up some kind of a cheat sheet,” he told me.
Great idea! So here you are, dear reader, a cheat sheet of the five PowerPoint techniques I employ on every presentation design project:
Slide Show view/
Start slide show on current page
- To start a slide show from the beginning of a presentation, press F5.
- To start a slide show from the slide you’re currently viewing, press Shift+F5.
You should review your work in the Slide Show view because that’s how the audience will be seeing it. You can check out your animation sequences and make sure that mouse clicks do what they’re supposed to.
[divider style=”shadow”]
Character Spacing
Character spacing (also called “kerning” or “letterspacing”) is the space between individual letters or numbers. I often find it necessary to reduce character spacing to make text fit within objects or to make text fit on a single line.
The character spacing icon is found in the Home ribbon:
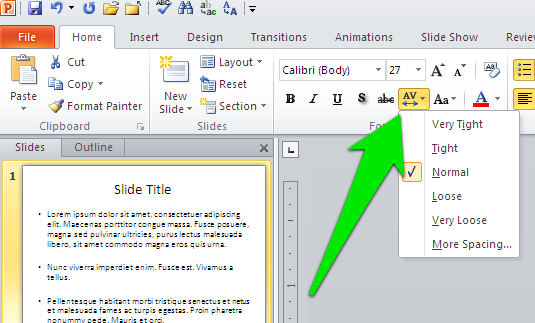
If the preset values don’t give you the results you’re looking for, then select “More Spacing” and enter the value you want. When condensing character spacing you should select the lowest possible value so that the text doesn’t look too squished. Over-condensed text looks bad next to normal text.
[divider style=”shadow”]
Line Spacing
There are two kinds of line spacing: the space between lines of text within a paragraph without a return and the space that appears after you hit the return key.
The PowerPoint default line spacing looks bad, with too much space between lines without returns and not enough on lines with returns, so I always end up changing the default settings.
The line spacing icon is also found in the Home ribbon:
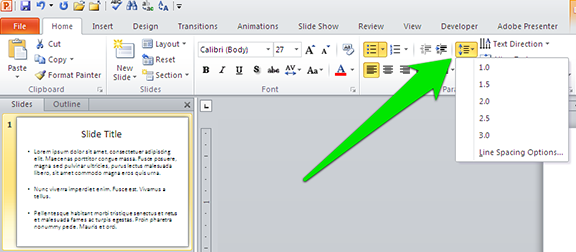
Select “Line Spacing Options” to have the most control over the spacing. I usually set the spacing before to 0pt and adjust the amount after until there’s a good separation between lines. I set the line spacing to be exactly the same point size as the text itself. Here’s a before-and-after comparison so you can see how this looks:
Before
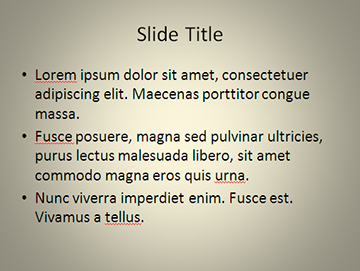
After
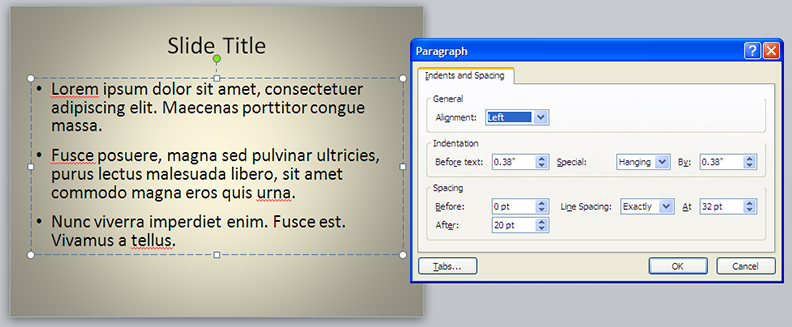
The line spacing for each bullet is now tighter, while the space between bullets has increased somewhat. This line spacing results in three distinct bullet points.
[divider style=”shadow”]
Format Shape
Right-clicking on an object gives you a flyout menu. Select “Format Shape” near the bottom of this menu to give you the ability to change all kinds of things about an object: fill color, line color, special effects, size, position, etc.
You can instantly see the results of your edits while the Format Object window is still open, saving you the trouble of reopening the window to make further changes. You can also leave this window open while you select other objects and close it when you are done with all of your formatting.
[divider style=”shadow”]
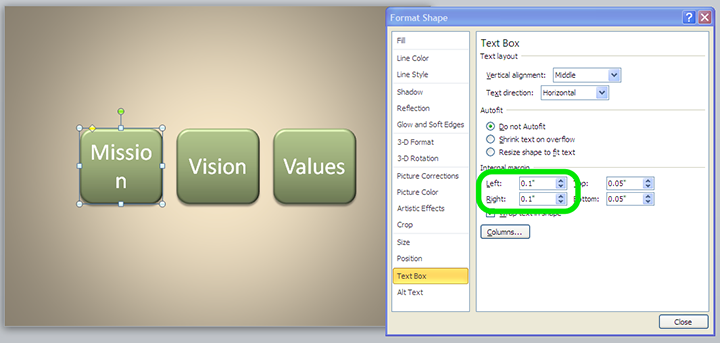
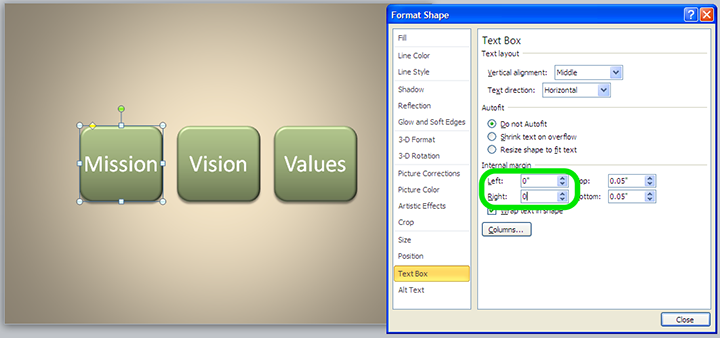
Format Text Box
The Format Object window has an option, Text Box, that is very handy for making text fit on one line within an object, orienting text within the object, and performing other text-related tasks.
Here’s the trick I most often use within this command: changing the left and right internal margins to 0″. This will often give you enough room to make your text fit on one line, as in this example:
Before
After
[divider style=”shadow”]
Want more tips?
Interested in other PowerPoint shortcuts and techniques? Then please write to me and let me know and I’ll provide more pro tips in a future blog.
Hey Laura! great info, thanks for sharing it with us. Now I don’t have to click on my first slide to preview my slides from beginning, all I would do is press F5 key.
Also, I believe that making a PowerPoint out of these and more cheat codes and sharing it online would make a great resource for all the PowerPoint users out there. 🙂
I would definitely love to know more about cheat codes for powerpoint presentation. This really sounds interesting. Looking forward for your next article.
Arpit
authorSTREAM Team