It’s easy to create your own custom clipart. By using the “save as picture” command on an object or group of objects, you can create a graphic that can be stored on your computer and used in other PowerPoint presentations, blogs, websites, Word docs, etc.
Using the Save as Picture command in PowerPoint
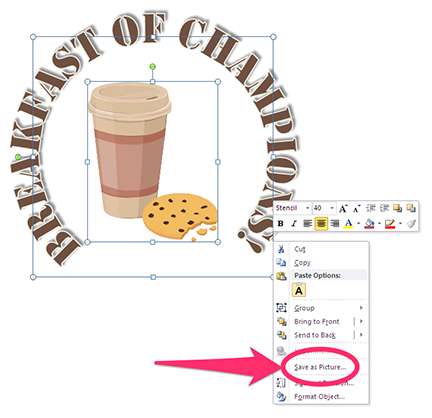
- Select objects on slide
- Right-click on one of the selected objects then select “Save as Picture” on the flyout menu.
- Give the file a name, navigate to the place in your computer where you want to store the artwork, and select the file type.
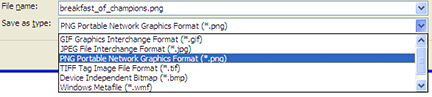
As you can see, there are many file formats to choose from: GIF, JPG, PNG, TIF, BMP, WMF and EMF (not pictured above, stands for “Enhanced Windows Metafile). I usually go with PNG because that gives the graphic a transparent background. Save it as a WMF if you want the ability to ungroup and reformat the color, shape, and size of objects that make up the graphic.
The “Save as Picture” command is similar to the “Paste as Picture” command in that it allows you to create graphics out of objects on a slide. But with “Save as Picture” the image you create is available for use again and again. Both commands render text uneditable, so be sure to keep a copy of your original images and text in case you have to make edits down the road.
Easy, right? Get goin’, Picasso, you’ve got some artwork to create!
Hey nice article, great stuff! Really appreciate this, I am happy I just learned something new. Thanks for sharing this out.
Arpit
authorSTREAM Team
I have avoided using wmf/emf files to store or share PowerPoint objects since they often do not create an object that can be edited in PowerPoint. For example, gradient fills, shadows and 3d objects are all converted to pictures (in the case of shadows, terrible pictures).
The only reliable way I have found to store and share PowerPoint “clipart” is simply as ppt pbjects in ppt files.
I haven’t had good luck preserving drop shadows and other special effects when I save objects as WMF files. But I find it’s the best format if you think you’ll need to ungroup and edit the placed object later, and you can always add the special effect to the regrouped object when you’re finished editing.
I feel stupid.. I saved it as a picture to my desktop, now how do I change it around?
The only way to edit the picture after you’ve created it is to go back to the source PowerPoint file, make your changes and resave it as a picture or to edit the picture file in Photoshop. Does that help?
yes, thank you
The only way to edit the picture after you’ve created it is to go back to the source PowerPoint file, make your changes and resave it as a picture or to edit the picture file in Photoshop.